How to perform a CNI Live Migration from Flannel+Calico to Cilium
This is a guest blog by Josh Van Leeuwen and covers how Josh implemented a CNI live migration for a customer, Sky Betting and Gaming, to live migrate a cluster running the Canal CNI plugin (Flannel+Calico) to Cilium. Josh is working as a Customer Reliability Engineer for Jetstack. Read on to hear what Josh has to say...
In this post we'll discuss why one might want to change CNIs, what I have learnt developing a solution for live migration, and how it all works.
What is CNI, and why change it?
Container Network Interface (CNI) is a big topic, but in short, CNI is a set of specifications that define an interface used by container orchestrators to set up networking between containers. In the Kubernetes space, the Kubelet is responsible for calling the CNI installed on the cluster so Pods are attached to the Kubernetes cluster network during creation, and its resources are properly released during deletion. CNIs can also be responsible for more advanced features than just setting up routes in the cluster, such as network policy enforcement, encryption, load balancing, etc.
There are many implementations of CNI for various use cases, each having their own advantages and disadvantages. Flannel is one such implementation, backed by iptables, and it is perhaps the most simple and popular in Kubernetes. Flannel is solely concerned with setting up routing between Pods in the Kubernetes cluster, which is achieved by creating an overlay network using the Virtual Extensible LAN (VXLAN) protocol. Another project, Calico, can be run as either a standalone CNI solution or on top of Flannel (called Canal) to provide network policy enforcement.
While using Flannel and Calico together is a solid solution, it can have problems. For example, Flannel can have issues at scale, and may not be as feature rich as other implementations.
Cilium is another CNI solution, based on eBPF, and is designed to be run at large scale. Whilst Cilium implements the standard NetworkPolicies, it is able to utilise the full packet introspection of eBPF, enabling it to have first class support for Layer 7 policy for a number of protocols, custom extensions using Envoy, large options for endpoint selection, as well as rich network monitoring introspection. For these reasons, Cilium becomes a very favourable choice for running Kubernetes at scale, with complex network policy requirements.
Since the CNI underpins the entire network running on Kubernetes, it would seem that the only solution for changing a CNI is to take the entire cluster down, replace it, and bring up all workloads again on the new CNI. This of course causes downtime, or at the least, requires a full cluster migration. For some companies this might be unacceptable. So, how about a live migration instead?
Designing a live CNI Migration
When a Pod is created, the installed CNI is called which will attach a network interface to the Pod. If all goes well, this network interface will join that Pod to the cluster network. The network interface shares the same life cycle as the Pod, meaning that only newly-created Pods will be picked up by the newer CNI if it was swapped out. This requires that all Pods on the cluster that are a part of the cluster network be recycled in order to be a member of the new CNI.
A naive approach to migrating a CNI would be to gradually roll each node on the cluster, and then replacing the CNI installed when the node is brought back up. This is however, not possible—the second CNI will be installed with a separate CIDR range to that of the currently installed CNI, which has no knowledge of the other network range. Not to mention the use of different encapsulation protocols, or broken network policy since identity is lost. This can be demonstrated below where Pods on Node 1 will be unable to communicate to Pods on Node 2, and visa versa.
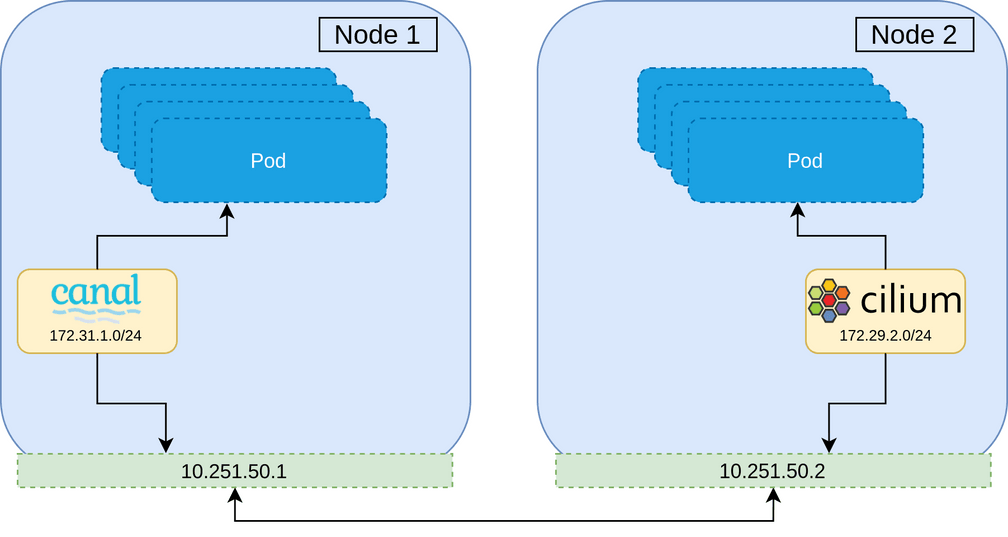
Separate CNIs installed
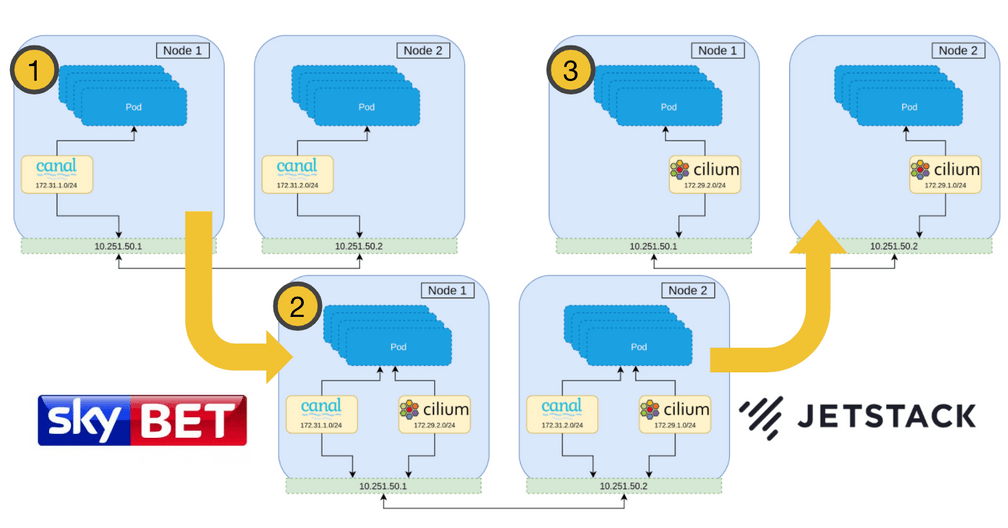
With this constraint, it is clear that during the migration, there must be a period in which all Pods on the cluster are members of both networks. Once all Pods are members of both networks, the first network can be peeled away, leaving only the new second CNI network remaining. In practice this means that routing decisions can be made based upon the destination IP and the corresponding network interface to use.
The best strategy therefore, is to install the new CNI alongside the current one and then remove the old CNI during the migration. The overview of the migration is as follows.
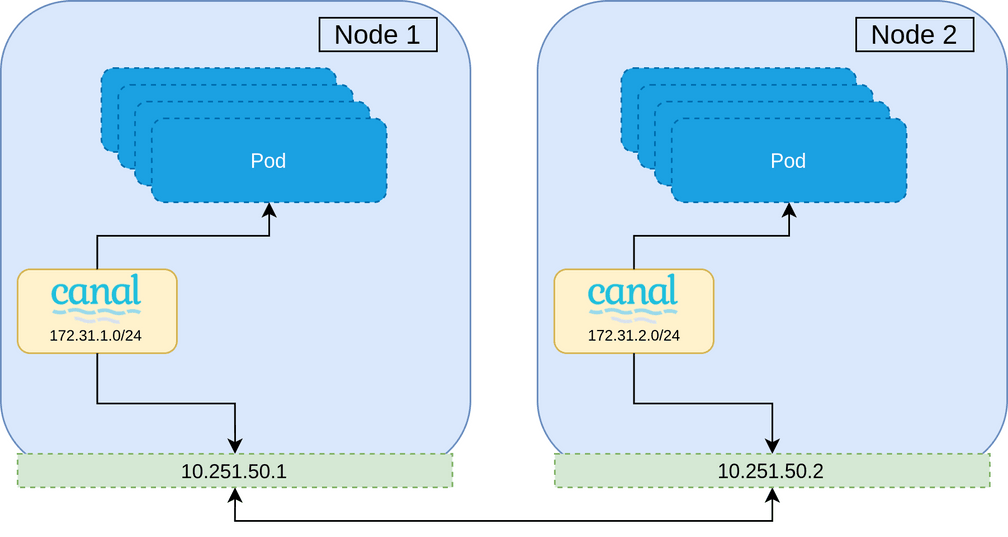
Step 0: Single CNI installed on the cluster.
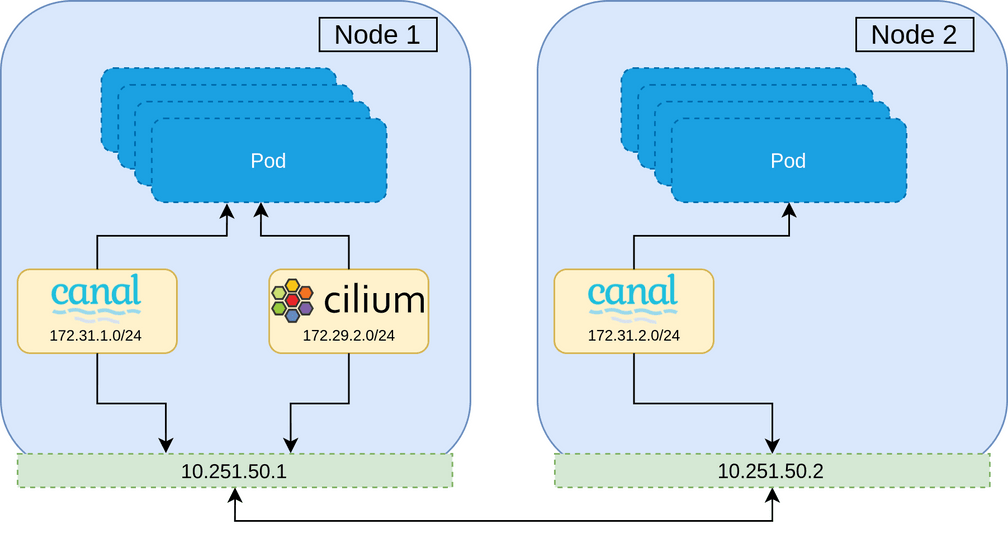
Step 1: Rollout the second CNI alongside the current. All pods communicate over the current.
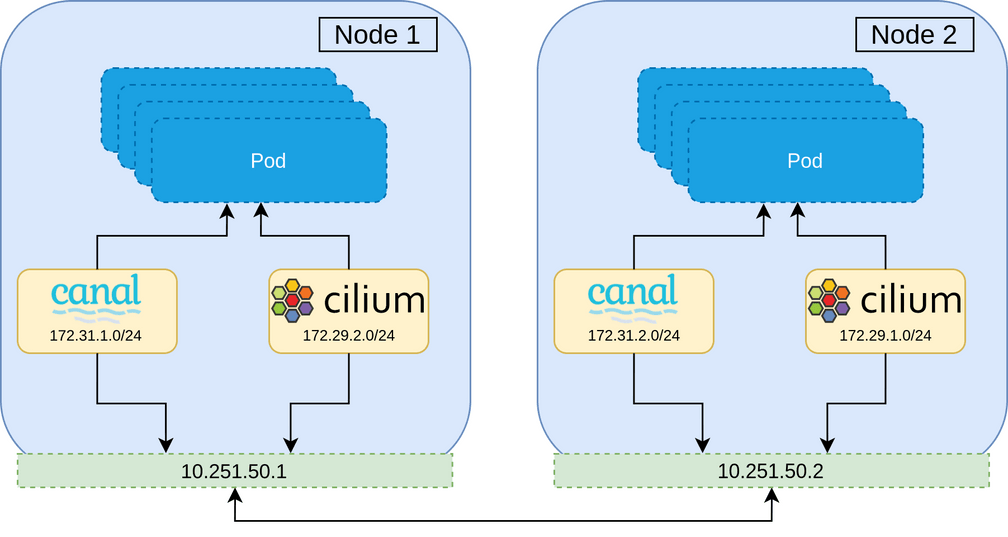
Step 2: Both CNIs installed on all nodes, and Pods can communicate on either CNI.
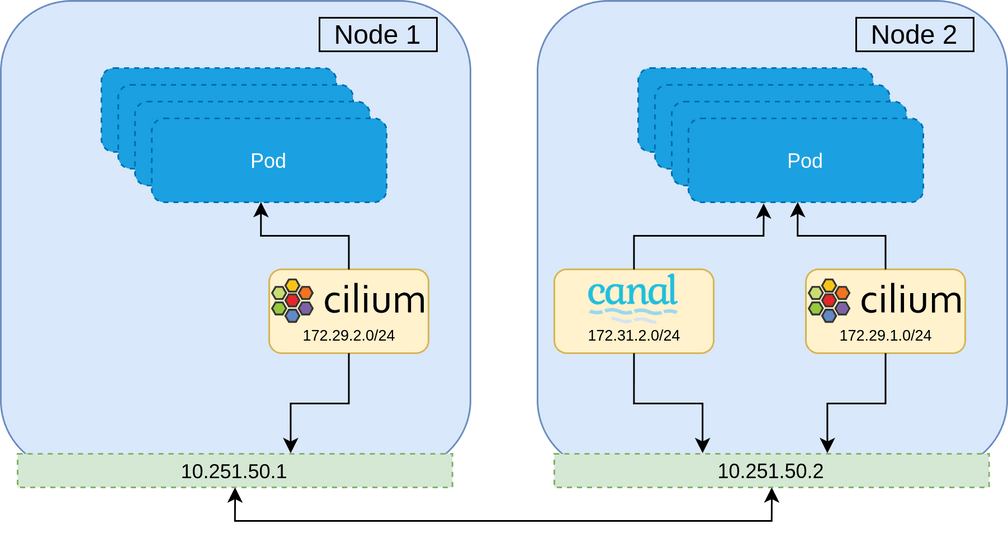
Step 3: Peel away the first CNI. Pods can communicate on the new CNI if the first is unavailable at the source or destination Pod.
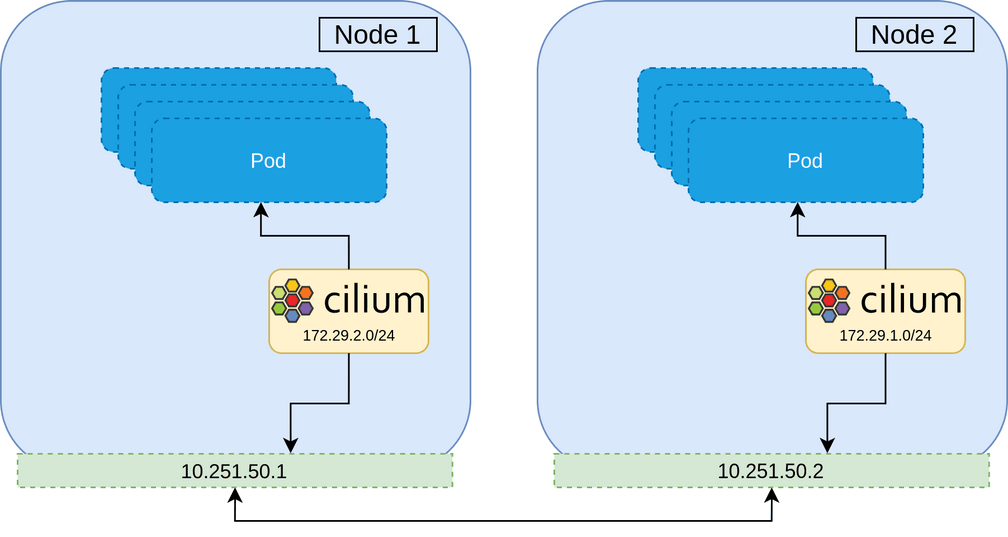
Step 4: First CNI is completely removed. All commination done over the new CNI.
This strategy maintains all network policy throughout the entire migration, and ensures no network downtime.
The caveat to this strategy is that all workloads on the cluster will need to be rolled several times. This should be acceptable. Workloads running on Kubernetes are expected to be resilient to service disruption and rescheduling, and with proper disruption budgets and probes, a conservative roll of the cluster at each migration step should ensure that the entire cluster remains healthy at all times.
Implementation
The end result of the project is a CLI tool that runs the migration from start to finish, allowing configuration of which steps to run, and ensuring cluster network health throughout the process. This is all configured using a config file and flags.
The CLI has support for running in a "dry mode", and will ensure all previous steps have been completed before continuing. The full migration consists of 6 steps which I will run through below.
# Node labels to use to check the status of each stage
labels:
  canal-cilium: node-role.kubernetes.io/canal-cilium
  cni-priority-canal: node-role.kubernetes.io/priority-canal
  cni-priority-cilium: node-role.kubernetes.io/priority-cilium
  rolled: node-role.kubernetes.io/rolled
  cilium: node-role.kubernetes.io/cilium
  migrated: node-role.kubernetes.io/migrated
  value: 'true' # used as the value to each label key

# File paths of resources for the migration
paths:
  cilium: ./resources/cilium.yaml
  multus: ./resources/multus.yaml
  knet-stress: ./resources/knet-stress.yaml

# Resources required to be deployed before any migration steps.
preflightResources:
  daemonsets:
    knet-stress:
      - knet-stress
      - knet-stress-2
  deployments:
  statefulsets:

# Resources to watch status for to ensure that the cluster is healthy at each
# stage. Must be installed and ready at prepare.
watchedResources:
  daemonsets:
    kube-system:
      - canal
      - cilium
      - cilium-migrated
      - kube-multus-canal
      - kube-multus-cilium
      - kube-controller-manager
      - kube-scheduler
    knet-stress:
      - knet-stress
      - knet-stress-2
  deployments:
  statefulsets:

# Resources to clean up at the end of the migration.
cleanUpResources:
  daemonsets:
    kube-system:
      - canal
      - cilium
      - kube-multus-canal
      - kube-multus-cilium
    knet-stress:
      - knet-stress
      - knet-stress-2
  deployments:
  statefulsets:
Step 0: Preflight
Before, during, and after the migration, we need to check that the cluster has
full network connectively in order to ensure there is no downtime. To do this, I
decided to write a small service called
knet-stress that regularly connects
to the other knet-stress services on the cluster. It does this by looking up a
Kubernetes Service, and sending an HTTP GET request to every endpoint IP
listed, including its own.
By running this as two DaemonSets under the same Service, we can cover Pod to Pod communication both between nodes, as well as Pods on the same node. The API lookup is also a good sanity check that the API server is still rotatable.
During the migration, we exec into each Pod and run a manual status check,
with the end result being that we have checked the bidirectional health of the
network, across the entire cluster.
DEBU[0016] [kubectl exec --namespace knet-stress knet-stress-tvhjv -- /knet-stress status]  step=0-preflight
time="2020-08-16T13:33:23Z" level=info msg="client: TLS disabled"
time="2020-08-16T13:33:23Z" level=info msg="client: sending request http://172.31.0.3:6443/hello"
time="2020-08-16T13:33:23Z" level=info msg="client: got response status code: 200"
time="2020-08-16T13:33:23Z" level=info msg="client: sending request http://172.31.0.4:6443/hello"
...
time="2020-08-16T13:33:23Z" level=info msg="client: sending request http://172.31.5.7:6443/hello"
time="2020-08-16T13:33:23Z" level=info msg="client: got response status code: 200"
time="2020-08-16T13:33:23Z" level=info msg="client: sending request http://172.31.5.8:6443/hello"
time="2020-08-16T13:33:23Z" level=info msg="client: got response status code: 200"
STATUS OK
We run knet-stress before and after every migration step, and is our source of truth for network connectivity.
Step 1: Prepare
This step is for installing all our dependant resources, and labelling nodes.
Node Labels
The migration will swap out multiple DaemonSets at various steps, so we use
Node Labels and
Selectors
to control the scheduling. Not only is it better to leave scheduling to
Kubernetes, but it's also a convenient way to observe where we are in the
migration through a simple kubectl get nodes. We also make sure that we patch
the first CNI, Canal, to have a node selector that we can use to uninstall it
at a later stage.
We define each label to use in the config, but are fine to leave as is.
# Node labels to use to check the status of each stage
labels:
  canal-cilium: node-role.kubernetes.io/canal-cilium
  cni-priority-canal: node-role.kubernetes.io/priority-canal
  cni-priority-cilium: node-role.kubernetes.io/priority-cilium
  rolled: node-role.kubernetes.io/rolled
  cilium: node-role.kubernetes.io/cilium
  migrated: node-role.kubernetes.io/migrated
  value: 'true' # used as the value to each label key
When a node's label is changed, Kubernetes will unschedule any of the DaemonSets which don't match the selector, and schedule those that do. We can then simply wait for the underlying Pods to become ready.
Step 2: Roll all Nodes
Multus
The first challenge faced as part of the migration is to run two CNIs in parallel, both servicing the same Pods. Luckily there is a project by Intel, multus-cni, which does exactly that. Multus is installed like most CNIs, as a DaemonSet. It acts as a middleman whereby calls made by the Kubelet are forwarded to the two configured CNIs underneath, each setting up a separate network interface on the Pod. In practice, if multiple CNIs are installed and configured, each newly created Pod will have a 'master' network interface, as well as a secondary network interfaces, one for each of the extra CNIs (and of course the loopback device). Only the master network interface is advertised to Kubernetes and used in Services, etc. Although the secondary Pod IP is not directly advertised to Kubernetes, it is still rotatable by other containers on that secondary network. This will become important later.
Multus is easy to setup, all that is needed are a few lines of config. for each CNI we want to install. It is also possible to configure Multus using a CRD, though a blanket cluster-wide configuration is more useful in our case.
{
  "name": "multusi-cni-network",
  "cniVersion": "0.3.1",
  "plugins": [
    {
      "cniVersion": "0.3.1",
      "name": "multus-cni-network",
      "type": "multus",
      "kubeconfig": "/etc/kubernetes/cni/net.d/multus.d/multus.kubeconfig",
      "confDir": "/etc/kubernetes/cni/net.d",
      "clusterNetwork": "k8s-pod-network",
      "defaultNetworks": ["cilium"],
      "systemNamespaces": [""]
    }
  ]
}
In this config, we have defined k8s-pod-network to be the master CNI network
(the name of the CNI config for Canal) and it is the network that is advertised
to Kubernetes. Cilium is the second CNI to be called. Finally, this config
should apply to all namespaces ("systemNamespaces": [""]).
CNI Ordering
When CNIs are installed on a cluster, they are naturally run as a DaemonSet to
set up networking on every node. With this, they also typically write out their
executable to file, as well as their configuration to an established directory
(typically somewhere like /etc/kubernetes/cni/net.d/). The Kubelet looks at
this directory to find the executable to run and its parameters.
Every time a new Pod is created, the Kubelet will list the files in the
directory, and use the configuration which is alphabetically first in the
list. For example, 00-multus.conflist is the CNI configuration that the
Kubelet will use in the following example:
$ ls -la /etc/kubernetes/cni/net.d/
total 56
drwxr-xr-x. 3 root root 4096 Aug 16 13:34 .
drwxr-xr-x. 3 root root 4096 Aug 16 13:29 ..
-rw-r--r--. 1 root root  415 Aug 16 13:34 00-multus.conflist
-rw-r--r--. 1 root root 1646 Aug 16 13:34 10-calico.conflist
-rw-r--r--. 1 root root   97 Aug 16 13:33 99-cilium.conf
-rw-------. 1 root root 1234 Aug 16 13:33 calico-kubeconfig
drwxr-xr-x. 2 root root 4096 Aug 16 13:34 multus.d
This strategy means that we can configure which CNI takes precedence by controlling the file locations that the CNI configuration is written to. Both Multus, and us during the migration, take advantage of this.
SBR Plugin
Cilium manages identity of
endpoints
in order to make routing and policy decisions. One issue that we ran into was
Cilium losing the source identity of requests when the request was being sent
as a non default, secondary network interface to the Pod. Cilium would interpret
the source of that request as an identity of
reserved:world,
which would then get dropped, never reaching the Pod. Although I didn't track
down what the source of the issue was, I was able to mitigate it by using the
SBR (Source Based Routing) CNI meta
plugin.
The SBR CNI meta plugin will cause the default route of the Pod to be overridden to the Cilium network interface. This fixed the issue, and Cilium was able to correctly determine source endpoint identity.
$ kubectl exec knet-stress-2-b99nz -- ip route
default via 169.254.1.1 dev eth0
169.254.1.1 dev eth0 scope link
172.29.100.122 dev net1 scope link$ kubectl exec knet-stress-2-br2t5 -- ip route
default via 172.29.197.231 dev net1
172.29.197.231 dev net1 scope linkEncapsulation Mode
Flannel and Cilium both support and default to VXLAN as the tunneling protocol to facilitate routing cluster traffic. VXLAN has support for running multiple networks on the same machines, separated by the VXLAN ID (VID); however, I was not able to find an option for configuring this in either Cilium or Flannel. This caused a conflict and prevented Cilium to start at all.
To fix this, I decided to configure Cilium to use GENEVE (Generic Network Virtualisation Encapsulation) instead. GENEVE is a newer encapsulation protocol designed to supersede VXLAN. This seemed like a fine compromise and I didn't encounter any problem going this route.
All Change
Now we have Multus installed, and have given it the precedence as the primary CNI, we now require that all Pods which are in the cluster network to be rolled. As described earlier, this is a required step since we need all of the Pods to be recreated to have both CNI network interfaces attached.
NAME                  READY   STATUS    RESTARTS   AGE     IP              NODE                                        NOMINATED NODE   READINESS GATES
knet-stress-2-bstdd   1/1     Running   0          5m19s   172.31.0.6      ip-10-99-0-156.eu-west-1.compute.internal   <none>           <none>
knet-stress-2-csf7g   1/1     Running   0          6m52s   172.31.1.6      ip-10-99-3-105.eu-west-1.compute.internal   <none>           <none>
knet-stress-2-kdl2r   1/1     Running   0          36s     172.31.5.2      ip-10-99-0-179.eu-west-1.compute.internal   <none>           <none>
knet-stress-2-r5gds   1/1     Running   0          6m15s   172.31.4.8      ip-10-99-1-77.eu-west-1.compute.internal    <none>           <none>
knet-stress-2-rlk5f   1/1     Running   0          5m19s   172.31.3.7      ip-10-99-2-248.eu-west-1.compute.internal   <none>           <none>
knet-stress-2-rp96s   1/1     Running   0          7m27s   172.31.2.6      ip-10-99-1-90.eu-west-1.compute.internal    <none>           <none>
knet-stress-5tz28     1/1     Running   0          5m19s   172.31.3.9      ip-10-99-0-179.eu-west-1.compute.internal   <none>           <none>
knet-stress-dcjzz     1/1     Running   0          6m49s   172.31.1.9      ip-10-99-1-77.eu-west-1.compute.internal    <none>           <none>
knet-stress-gc7m8     1/1     Running   0          6m14s   172.31.4.10     ip-10-99-1-90.eu-west-1.compute.internal    <none>           <none>
knet-stress-hbct8     1/1     Running   0          7m16s   172.31.2.8      ip-10-99-0-156.eu-west-1.compute.internal   <none>           <none>
knet-stress-llp82     1/1     Running   0          36s     172.31.5.4      ip-10-99-3-105.eu-west-1.compute.internal   <none>           <none>
knet-stress-mc9m7     1/1     Running   0          5m18s   172.31.0.8      ip-10-99-2-248.eu-west-1.compute.internal   <none>           <none>
Step 3: Change CNI Priority
This stage involves changing the CNI priority for all nodes so that Cilium becomes the primary CNI. To achieve this, we install a new Multus DaemonSet with Cilium as the primary CNI, and Canal as the secondary.
{
  "name": "multusi-cni-network",
  "cniVersion": "0.3.1",
  "plugins": [
    {
      "cniVersion": "0.3.1",
      "name": "multus-cni-network",
      "type": "multus",
      "kubeconfig": "/etc/kubernetes/cni/net.d/multus.d/multus.kubeconfig",
      "confDir": "/etc/kubernetes/cni/net.d",
      "clusterNetwork": "cilium",
      "defaultNetworks": ["canal"],
      "systemNamespaces": [""]
    }
  ]
}
To do this, we taint and drain the node, relabel it so that a new mutlus Pod is scheduled using the updated configuration, and then untaint the node. This causes all Pods to be rescheduled on that node which are now all members of both CNIs, but their advertised IP is that of Cilium's network. We repeat this process for all nodes in the cluster, ensuring that there is total network connectivity throughout.
NAME                  READY   STATUS    RESTARTS   AGE   IP               NODE                                        NOMINATED NODE   READINESS GATES
knet-stress-2-28jz8   1/1     Running   0          19m   172.29.23.7      ip-10-99-0-156.eu-west-1.compute.internal   <none>           <none>
knet-stress-2-5vt2w   1/1     Running   0          13m   172.29.82.217    ip-10-99-3-105.eu-west-1.compute.internal   <none>           <none>
knet-stress-2-fcwqt   1/1     Running   0          17m   172.29.163.144   ip-10-99-0-179.eu-west-1.compute.internal   <none>           <none>
knet-stress-2-jfr2r   1/1     Running   0          17m   172.29.157.128   ip-10-99-1-77.eu-west-1.compute.internal    <none>           <none>
knet-stress-2-l9kzs   1/1     Running   0          14m   172.29.57.215    ip-10-99-2-248.eu-west-1.compute.internal   <none>           <none>
knet-stress-2-pzggb   1/1     Running   0          15m   172.29.60.178    ip-10-99-1-90.eu-west-1.compute.internal    <none>           <none>
knet-stress-bmftj     1/1     Running   0          17m   172.29.225.70    ip-10-99-0-179.eu-west-1.compute.internal   <none>           <none>
knet-stress-c5sgd     1/1     Running   0          17m   172.29.110.42    ip-10-99-1-77.eu-west-1.compute.internal    <none>           <none>
knet-stress-g5qbv     1/1     Running   0          15m   172.29.93.51     ip-10-99-1-90.eu-west-1.compute.internal    <none>           <none>
knet-stress-k5vz9     1/1     Running   0          19m   172.29.56.36     ip-10-99-0-156.eu-west-1.compute.internal   <none>           <none>
knet-stress-smghl     1/1     Running   0          13m   172.29.127.250   ip-10-99-3-105.eu-west-1.compute.internal   <none>           <none>
knet-stress-w4ksd     1/1     Running   0          14m   172.29.188.52    ip-10-99-2-248.eu-west-1.compute.internal   <none>           <none>
The end result of this stage is that we have both CNIs installed for all nodes, and each Pod has two network interfaces attached, with the primary and advertised Pod IP address in Cilium's network.
NAME                                        STATUS   ROLES                                        AGE   VERSION
ip-10-99-0-156.eu-west-1.compute.internal   Ready    canal-cilium,master,priority-cilium,rolled   79m   v1.17.3
ip-10-99-0-179.eu-west-1.compute.internal   Ready    canal-cilium,master,priority-cilium,rolled   79m   v1.17.3
ip-10-99-1-77.eu-west-1.compute.internal    Ready    canal-cilium,priority-cilium,rolled,worker   79m   v1.17.3
ip-10-99-1-90.eu-west-1.compute.internal    Ready    canal-cilium,priority-cilium,rolled,worker   79m   v1.17.3
ip-10-99-2-248.eu-west-1.compute.internal   Ready    canal-cilium,priority-cilium,rolled,worker   79m   v1.17.3
ip-10-99-3-105.eu-west-1.compute.internal   Ready    canal-cilium,master,priority-cilium,rolled   79m   v1.17.3
Step 4: Migration
With all Pods now using Cilium as their primary CNI, Canal is not being anymore and so can be safely uninstalled everywhere. We repeat a similar process as before; tainting and draining a node, relabelling it so that the old Canal and Cilium CNIs are uninstalled, installing a duplicated Cilium CNI that selects that node label, and bringing the node back up.
Repeating this process, we finally get all Pods to use Cilium.
ip-10-99-0-179 net.d # ls -al
total 72
drwxr-xr-x. 3 root root 4096 Aug 16 14:51 .
drwxr-xr-x. 3 root root 4096 Aug 16 13:29 ..
-rw-r--r--. 1 root root   97 Aug 16 14:51 00-cilium.conf
-rw-r--r--. 1 root root  404 Aug 16 14:45 00-multus.conflist
-rw-r--r--. 1 root root 1655 Aug 16 14:32 10-calico.conflist
-rw-r--r--. 1 root root   97 Aug 16 13:33 99-cilium.conf
-rw-r--r--. 1 root root  300 Aug 16 14:45 99-flannel.conflist
-rw-------. 1 root root 1234 Aug 16 13:33 calico-kubeconfig
drwxr-xr-x. 2 root root 4096 Aug 16 13:34 multus.dNAME STATUS ROLES AGE VERSION
ip-10-99-0-156.eu-west-1.compute.internal Ready cilium,master,migrated,rolled 99m v1.17.3
ip-10-99-0-179.eu-west-1.compute.internal Ready cilium,master,migrated,rolled 99m v1.17.3
ip-10-99-1-77.eu-west-1.compute.internal Ready cilium,migrated,rolled,worker 99m v1.17.3
ip-10-99-1-90.eu-west-1.compute.internal Ready cilium,migrated,rolled,worker 99m v1.17.3
ip-10-99-2-248.eu-west-1.compute.internal Ready cilium,migrated,rolled,worker 99m v1.17.3
ip-10-99-3-105.eu-west-1.compute.internal Ready cilium,master,migrated,rolled 99m v1.17.3Step 5: Clean Up
This step simply removes all resources no longer needed: the old Canal
installation, unscheduled Multus, and Cilium DaemonSets. It also patches the
installed Cilium DaemonSet to remove the migrated node label selector.
If all goes according to the plan, we have now successfully migrated the CNI installation from Canal to Cilium, live.
